
How to Repair Kitchen Ceiling Water Damage? We’ve all been there—looking up at our kitchen ceiling only to find an unwelcome water stain staring back at us. The clock starts ticking the moment you spot it. Repairing water damage isn’t just about aesthetic appeal; it’s about safeguarding the structure of your home and your health. So, let’s get right to it!
Repairing kitchen ceiling water damage involves identifying the source of the leak, drying the affected area, removing damaged materials, and restoring the ceiling to its original state.

Identifying the Source of Water Damage
The first step is identifying the culprit. Is it a leaky roof, a busted pipe, or maybe something more sinister like mold? Using specialized tools can be a game-changer here, pinpointing the exact location and nature of the leak. Sometimes, a professional assessment is the quickest way to get to the root of the issue.
Immediate Actions to Contain Damage
While you’re playing detective, don’t forget to contain the spread of water. Place buckets under any active leaks, and consider using a tarp to protect your kitchen furniture and flooring. Every minute counts, so act fast!
Drying the Affected Area
Once you’ve stopped the leak—at least temporarily—it’s crucial to dry the area thoroughly. You can use fans to speed up the process, but in extreme cases, a section of the ceiling may need to be removed for thorough drying. Don’t take half measures; lingering moisture can lead to mold.
Removing Damaged Parts
Safety first! Put on some gloves and protective eyewear, and get ready to remove any water-damaged insulation or drywall. A drywall saw can be your best friend here. Cut back to the closest joists and make sure to dispose of damaged materials properly.
Preventing Mold and Microbial Growth
Once the damaged parts are gone, it’s time to think about prevention. Ensure the area is as dry as possible and consider using antimicrobial treatments to stop mold before it starts growing.
Repairing the Ceiling
This is the make-or-break stage. You’ll need some new drywall, a utility knife, and a lot of patience. Cut the new drywall to fit the hole, attach it to the joists, and start mudding and taping. Once it’s dry, sand it down to create a smooth surface.
Painting and Finishing
Once repairs are complete, grab your paint and primer. Opt for a water-resistant variety to safeguard against future issues. And don’t forget to open all windows for proper ventilation while painting.
Real-World Concerns and Solutions: A Forum Case Study
In a recent forum discussion started by a user named Randy on October 31, 2023, homeowners exchanged their experiences on handling Kitchen Ceiling Water Damage caused by a bathroom leak above. They addressed a few critical concerns:
Best Materials for Repair
According to Randy, the leak had been dealt with, and they were looking to repair the kitchen ceiling themselves. They wanted to know the best materials to use for a spotless finish. Built2last, an active forum member, suggested checking if the plasterboard had gone soft. If so, they advised cutting it back to a stable point, taping the joins, and applying a skim coat.
Avoiding the Reappearance of Cracks
Randy was also concerned about preventing cracks from reappearing. Built2last recommended using Tourette filler to fill any cracks or imperfections, then sanding it smooth.
Painting Over Water Damage
For the final touch, Built2last suggested using Zinsser Cover Stain Primer to prime the area before painting the ceiling, ensuring a stain-free and uniform finish.
Water Damage Concerns Beyond the Pool: What You Should Know
While this article primarily focuses on pool remodelling, it’s important to discuss how water damage can occur in other parts of the home as well. A forum discussion from October 2017 highlighted some common concerns and solutions that homeowners face, particularly concerning water damage on ceilings. Here’s a recap:
Identifying the Problem
One forum member, Bigger Boat, noticed a patch of puckering paint on a downstairs bedroom ceiling, right below an upstairs bedroom and master bath. The issue for many homeowners like him is determining the source of the problem. Is it a leak from the plumbing or something else? The immediate question is, who should you call?
Expert Advice from Forum Members
Immediate Response: Several members, such as Wumpus and Courteous, emphasized the urgency of addressing water damage. They recommended calling a plumber as soon as possible to identify and fix the leak.
Alternative Solutions: Misguided mentioned that if you have a good handyman, they could be more economical for diagnosing and repairing minor water damage.
Mold Concerns: Tranquility Base pointed out another reason to act quickly—mold formation, especially in humid areas.
Professional Help: Charlatan provided a detailed insight into what a plumber will do. They will likely remove parts of the drywall to identify the source of the leak. However, they might not handle repainting, which could be an additional task for you or another contractor.
Finding Reliable Help: For those like Lee Abe who are first-time homeowners, finding reliable help can be daunting. Synth suggested using platforms like Angieslist, HomeAdvisor, or even community websites like Nextdoor.
DIY Temporary Fixes: Users like wisefool suggested quick fixes like JB Weld steel putty for small holes in pipes, but emphasized that these are temporary measures until professional help arrives.
Relevance to Pool Remodeling
Though the forum discussion is focused on indoor water damage, the concerns are quite relevant to pool remodelling. Pools can leak and cause water damage to surrounding areas, including indoor spaces if the pool is near the home. Awareness and quick action are vital, regardless of where the leak originates.
Conclusion
Repairing a Kitchen Ceiling Water Damage might feel overwhelming, but tackling it head-on is crucial for preventing more serious issues down the line. Whether you’re a DIY enthusiast or prefer to leave it to the professionals, timely action can save your ceiling—and possibly your home.
FAQ Section of How to Repair Kitchen Ceiling Water Damage
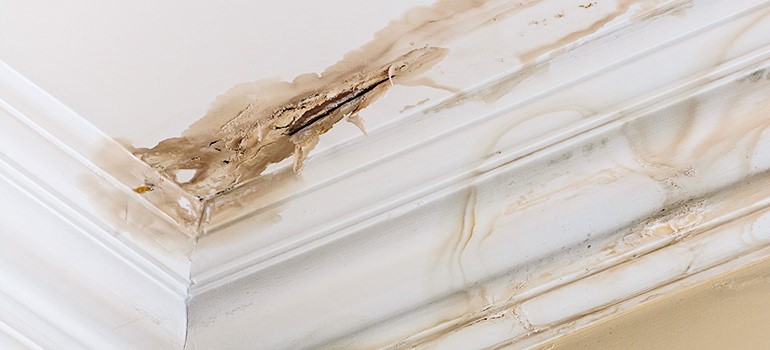
How do I know if my kitchen ceiling has water damage?
Signs of water damage include stains, peeling paint, and a sagging ceiling. If you notice any of these symptoms, immediate action is advised.
What to Do If You Spot Water Damage on Your Kitchen Ceiling?
First things first, grab a bucket and place it under the leak to catch the dripping water. You don’t want a puddle forming on your floor! Move any furniture or valuables out of the way to prevent them from getting damaged.
Can I Fix the Ugly, Water-Damaged Ceiling Paint Myself?
You bet! Once you’ve got the area all dry and have sorted out whatever caused the leak in the first place, you can repaint it. Start with a good water-based primer to cover up any stains. Once that dries, go ahead and apply your new coat of paint.
How Long Am I Looking for This Ceiling to Dry?
Well, the drying time depends on a few things like how bad the damage is and what kind of tools you’re using to dry it out. But generally, you’re looking at a few hours to possibly a few days. Patience is key here.
Can I Just Paint Over It and Call It a Day?
Technically, you could, but let’s do it the right way, shall we? Make sure the area is totally dry and repaired first. Investing in water-resistant primer and paint is also a smart move to protect against future issues.
What Happens If I Just Ignore It?
Not a great idea. Over time, you could end up with some serious structural issues and even mold growth, which nobody wants. Plus, ignoring water damage can become a health hazard for you and your family. So, better to tackle this head-on!