
Learn About How To Repair A Floor Joist Damaged By Water:- Floor joists are fundamental to the structural integrity of any building, providing the necessary support for floors and ensuring that weight is evenly distributed across the structure.
These horizontal beams, often made of solid lumber like Southern yellow pine or Douglas fir, are critical in both residential and commercial buildings. The importance of maintaining healthy floor joists cannot be overstated. Not only do they uphold the structural integrity of your home, but they also impact the safety and comfort of the living space.
This guide is designed to walk you through the steps of identifying, assessing, and repairing water-damaged floor joists, ensuring that your building remains safe and sound. Whether you’re a DIY enthusiast looking to tackle the repair yourself or a homeowner deciding when to call in professional help, this comprehensive guide has you covered.
To repair a floor joist damaged by water, identify the source of moisture, allow the joist to dry, reinforce the damaged area with sistering or supplemental beams, and ensure the integrity of the surrounding structure.
Understanding Floor Joists and the Impact of Water Damage
What Are Floor Joists?
Floor joists are the horizontal beams that form the framework of a floor. They run perpendicular to the main beams and provide crucial support for the subflooring, which in turn supports everything in your living space, furniture, appliances, and people. Typically made from solid lumber such as Southern yellow pine or Douglas fir, floor joists are chosen for their strength and durability. However, because they are made from wood, they are naturally susceptible to damage from moisture.
How Floor Joists Become Water-Damaged
Water damage to floor joists can occur due to several factors. Plumbing leaks, floods, high humidity, and poor ventilation are common causes. When water penetrates the wood, it can lead to rot, whether it’s dry rot or wet rot, and facilitate the growth of mold and mildew. Over time, this moisture can weaken the structural integrity of the joists, causing them to warp, sag, or even collapse. If left untreated, this damage can spread to other parts of the structure, leading to more extensive and costly repairs.
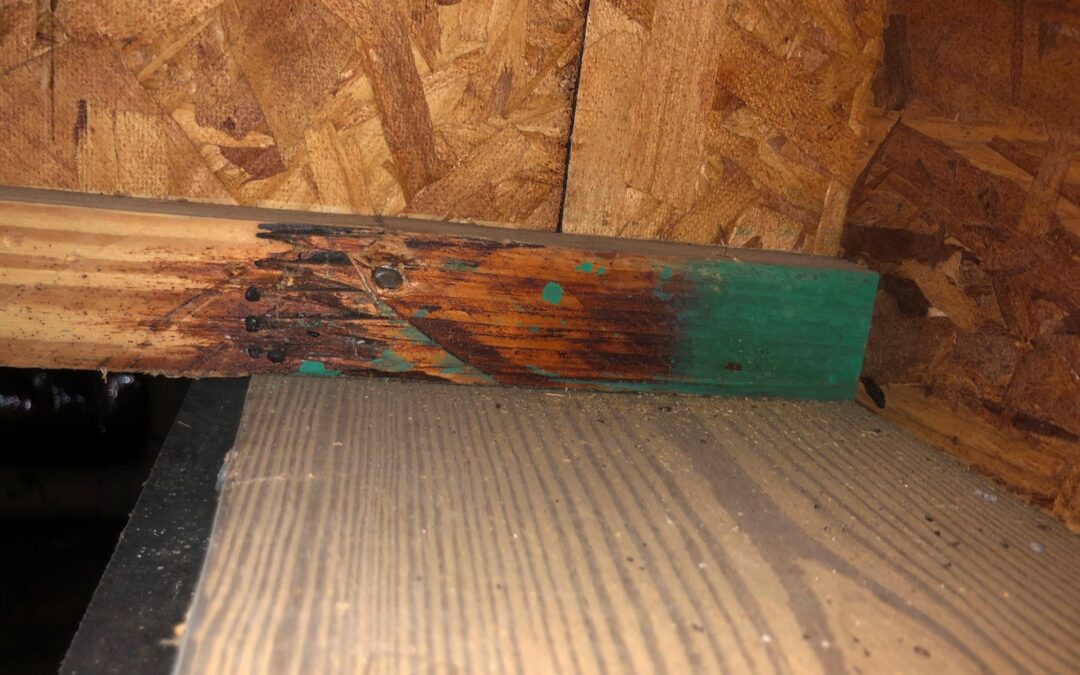
Signs of Water-Damaged Floor Joists
Identifying water damage early is crucial to prevent further deterioration. Some of the telltale signs include sagging or uneven floors, bouncy floors, and musty odors, which may indicate the presence of mold. Visually, water-damaged joists may appear darkened, soggy, or show signs of fungal growth. Using moisture meters can help detect hidden moisture within the wood, even if visible signs are not yet apparent.
Step-by-Step Guide to Repairing Water-Damaged Floor Joists
Identify and Stop the Source of Moisture
Before you can repair the damage, it’s essential to address the root cause of the moisture. This could involve fixing plumbing leaks, improving ventilation, or addressing condensation issues. If the moisture source is not dealt with, any repairs you make will likely be short-lived, as the problem will continue to recur.
Allow the Joist to Dry
Once the source of moisture is eliminated, the next step is to ensure the joist is completely dry. This can be achieved using fans, dehumidifiers, or simply increasing ventilation in the affected area. In some cases, it might be necessary to remove parts of the subflooring or ceiling to expose the joists fully. Thorough drying is critical to prevent further rot and to prepare the wood for reinforcement.
Reinforce the Damaged Area Using Sistering or Supplemental Beams
Depending on the extent of the damage, you may choose to reinforce the joist rather than replace it entirely. Sistering involves adding a new piece of lumber alongside the damaged joist, effectively doubling the support in that area.
Ensure the new lumber is of the same size and type as the original joist, and use construction adhesive, wood screws, and carriage bolts to secure it in place. In more severe cases, you may need to use heavy-duty floor jacks to install supplemental beams, which provide additional support and lift the floor back to a level position.
Replace Severely Damaged Sections
If the damage is extensive and the joist is beyond repair, it may be necessary to replace the affected section entirely. This involves cutting out the damaged portion and replacing it with new lumber of the same size and type. Secure the new section using steel plates and ensure it is properly aligned with the existing structure to maintain the floor’s integrity.
Prevent Future Damage
After completing the repair, take steps to prevent future water damage. This includes improving ventilation in areas prone to moisture, using moisture-resistant materials where possible, and regularly inspecting your floor joists for signs of damage. Additionally, consider applying waterproofing sealants to the wood for extra protection.
Conclusion
Repairing water-damaged floor joists is a critical task that requires careful attention to detail and a thorough understanding of the underlying causes. By following the steps outlined in this guide, you can effectively restore the structural integrity of your home and prevent future damage. Whether you choose to tackle the repair yourself or hire a professional, addressing the issue promptly will save you time, money, and stress in the long run.
FAQs About How To Repair A Floor Joist Damaged By Water
How do I know if my floor joist is damaged by water?
Signs of water damage include sagging floors, visible rot, mold growth, and weakened or spongy wood. If you notice any of these, it’s important to inspect the joist for damage.
Can I repair a water-damaged floor joist myself?
Minor water damage can sometimes be repaired by reinforcing the joist with sistering techniques. However, for significant damage or structural concerns, it’s best to consult a professional.
What’s the process for repairing a water-damaged floor joist?
The typical repair process involves removing the damaged section, reinforcing or replacing the joist, and treating the area to prevent future water damage. Sistering a new joist alongside the damaged one is a common method.
How long does it take to repair a water-damaged floor joist?
Repair time varies based on the extent of the damage. Simple repairs can take a few hours, while more extensive damage may require several days, especially if additional structural repairs are needed.
How can I prevent floor joists from future water damage?
Ensure proper ventilation, fix any leaks immediately, and apply waterproof coatings to prevent future damage. Regularly inspect areas prone to moisture, such as basements or crawl spaces.